Workflows are automated triggers to perform certain actions in Ultra Commerce. Some examples of workflow usage might be an Order Confirmation email, or processing a queue of items to be updated.
1. Creating a Workflow
To access the Workflows listing, click on Telligence from the Ultra Commerce toolbar,
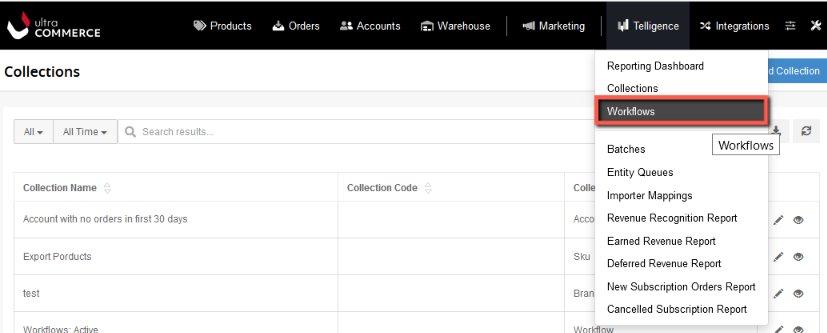
then click on Workflows from the drop-down. Any workflows that have been created will be listed here.
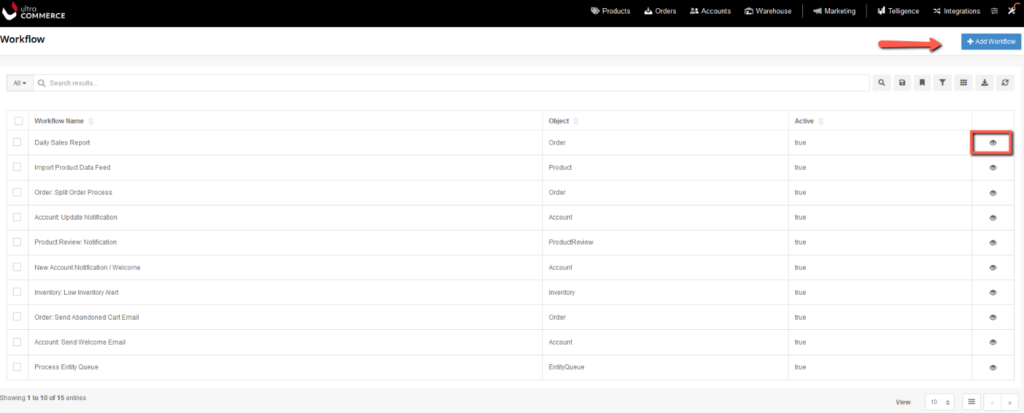
To create a new workflow, click the +Add Workflow button. This will bring you to the New Workflow create screen with the Basic accordion expanded.
Under the Basic tab:
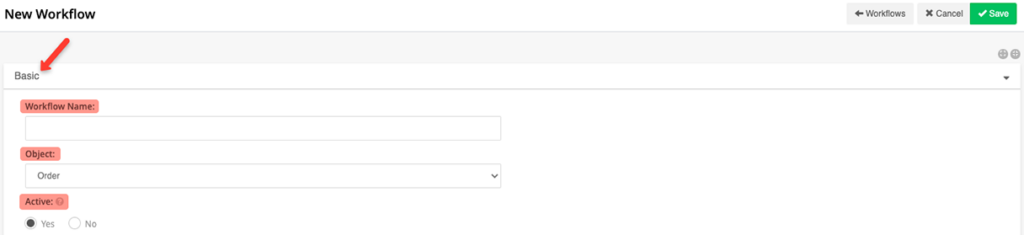
- Workflow Name: Fill this field with a name that will give an idea of what the workflow does.
- Object: Select the object related to the workflow. So, if you are creating an Order workflow for orders where the order is successfully placed, you would select Order for the object.
- Active: When creating the workflow, it is recommended to keep the workflow deactivated. When the workflow is ready to be run, set this to Yes.
2. Configure the Workflow
Add a Trigger to the Workflow
The next step to creating a workflow is to add a Trigger to the workflow. The Trigger can be either schedule- or action-based, and will define when the workflow runs the process defined in the Tasks section.
Under the Triggers accordion, there will be a list of all created triggers (by default, none). To add a trigger:

- Click the +Add Trigger button,
the New Trigger modal will appear.
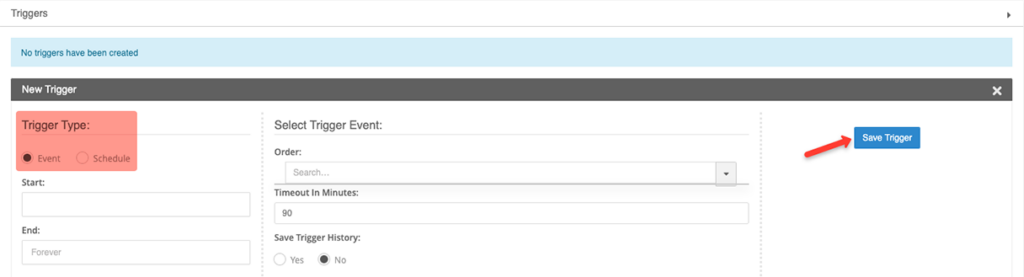
- Select Event or Schedule for the trigger type required.
- An event based trigger might be: An email being sent once an order is placed (place order success would be the trigger).
- A schedule based trigger might be: Sending an email once a week with product information.
For an event based trigger:
-
- Start: Select a start date for the trigger.
- End: Select an end date for the trigger.
- Select Trigger Event Search: Start typing to search for a trigger event, or click the triangle on the right to reveal the available triggers. (Only for event-based triggers)
- Timeout In Minutes: How many minutes before timeout.
- Save Trigger History: Yes or No. Set this to Yes if you’d like a history of the trigger.
- Save the trigger and the workflow.
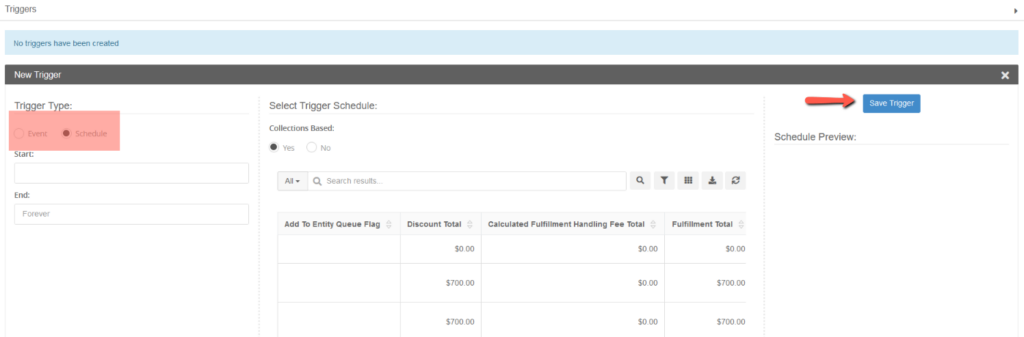
- Start: Select a start date for the trigger.
- End: Select an end date for the trigger.
- Indicate if the trigger is collections based or not.
- If yes, apply needed filters to the collection.
- Select Schedule Frequency.
- Save Trigger History: Yes or No. Set this to Yes if you’d like a history of the trigger.
- Save the trigger and the workflow.
Set up Workflow Task or Action
Next we’ll need to set up the workflow task or action that the workflow needs to perform.
Click Tasks to expand the tab, any tasks that have been created will be listed here as well as a +Create New Task button to create a new task:

- Click the +Create New Task button.
The Create New Task modal will appear with three tabs Basic, Conditions and Actions.

- Basic tab: This tab contains the Task Name and Active status.
- Task Name: Add a task name here.
- Active: Indicate if the task is active by selecting Yes or No.
- Conditions tab: If the task should only occur under certain conditions rather than every time the event is triggered, then create a filter here to specify the conditions. In the example where an email is generated once an order is placed successfully, no conditions need be applied. However, if a condition is desired:
- Click the +Filter button.
- The Define Filter modal will appear.
- Actions tab: This is where the action is added.
- Click the +Add Action button.
- The Add Action modal will appear with the choices of Print, Email, Delete, Process, Webhook.
- Configure the action selected.
- Click Save & Finish on the task, and save the workflow.
Don’t forget to activate your workflow now that it is complete by setting Active to Yes.
3. Transactional Email Workflows
<content needed>